自宅用ウェイトトレーニング機材

私が家で使用しているウェイトトレーニング機材を紹介します。お家に機材があれば台風の日でも筋トレできますし機材の空きを待つ必要もないです。ジムの会費を考えれば投資もすぐに回収できます!

バーベルスタンド

セパレート型なので組み合わせると50cm x 55cm となり場所を取りません。ウチでは使わないときはベランダに置いてカバーを掛けてます。折りたたんだときはこんな感じ

一体型に比べると安定性は劣るのですが自宅用にはやはり省スペースは魅力です。
あと、気になるところは、セーフティーバーがもうちょっと長ければなと思います。

ベンチ台

私が買ったときは二分割はできなかったのですがさらにコンパクトになるようです。ただ、固定タイプに比べると折りたたみタイプは多少のガタツキが出ます。

バーベルシャフト&プレート

類似品もありますが私はファイティングロードのプレートとシャフトを選びました。とりあえず50kgや70kgのセットを買って物足りなくなったらプレート買い足すのが良いと思います。
なおプレート止めが付属のやつだと固定時に面倒なので私は以下のプレート止め別途買いました。

懸垂マシン

ウェイト機材ではないですが懸垂台も持っています。二頭筋や背筋を鍛えるのに最適です。
ディップス用のバーと、プッシュアップ用のバーも付いているのでバーベルやらずに手軽に三頭筋や胸筋を鍛えることもできます。

ついでに・・・

こちらが我が家での設置時の写真です。リビングのテーブルとソファーを移動して設置してます。シャフトの途中には万一のためにためにスクワットパッドを巻いてます。


[C++] Whiteboxで内部オブジェクトをmockオブジェクトに置き換える

テストしたいクラス


public class MyClass 
{
    private InternalClass internalClass;
    void SomeMethod() 
    {
        internalClass.InternalMethod(); 
    }
}

MyClassの内部で作られるクラス


public class InternalClass 
{
    // MyClass#SomeMethod()の中で呼ばれるMock化したいメソッド
    public void InternalMethod() 
    {
        // do something
    }
}

テストコード


public class MyClassUTest 
{
    @Spy
    InternalClass mockInternalClass = new InternalClass();

    MyClass MyClass;

    @Before 
    void setUp() 
    {
        myClass = new MyClass();
        doNothing().when(internalClass).internalMethod(any());
        Whitebox.setInternalState(myClass, "internalClass", mockInternalClass);

    }

    @Test
    public void testMyClass()
    {
        myClass.SomeMethod();
    }
}

[C++] PowerMockで内部オブジェクトをmock化する

テストしたいクラス


public class SomeClass 
{
    private InternalClass internalClass;
    void SomeMethod() 
    {
        internalClass.InternalMethod(); 
    }
}

SomeClassの内部で作られるクラス


public class InternalClass 
{
    // SomeClass#SomeMethod()の中で呼ばれるMock化したいメソッド
    public void InternalMethod() 
    {
        // do something
    }
}

テストコード

@RunWith(PowerMockRunner.class)
@PrepareForTest(SomeClass.class)
public class SomeClassUTest 
{
    @Mock
    InternalClass internalClass;

    @Before 
    void setUp() 
    {
        doNothing().when(internalClass).internalMethod(any());
        PowerMockito
           .whenNew(InternalClass.class)
           .withAnyArguments()
           .thenReturn(internalClass);
    }

    @Test
    public void testSomeClass()
    {
        someClass = new SomeClass();
        someClass.SomeMethod();
    }
}

Twitterアプリ『にゃ~ん』のプライベートポリシー

収集するデータ

『にゃーん』が収集するデータはありません。

プライバシーポリシーの変更

『にゃーん』のプライバシーポリシーは予告なく変更される場合があります。

免責事項

『にゃーん』の使用により何らかのトラブルや損失・損害があった場合でも一切の責任を負いません。


トレーニング・タイマー プライバシー ポリシー

収集するデータ

トレーニング・タイマーが収集するデータはありません。

プライバシーポリシーの変更

トレーニング・タイマーのプライバシーポリシーは予告なく変更される場合があります。

免責事項

トレーニング・タイマーの使用により何らかのトラブルや損失・損害があった場合でも一切の責任を負いません。

[C++/Windows] wstring/UTF16でエンコードされたファイルを読み込む

wstring の場合

#include <codecvt>
#include <iostream>
#include <locale>
#include <fstream>

int main()
{
    std::basic_ifstream<wchar_t> ifs("C:\\hoge1.txt", std::ios::binary);
    ifs.imbue(std::locale(
        ifs.getloc(), 
        new std::codecvt_utf16<wchar_t, 0x10ffff, std::codecvt_mode( std::little_endian |std::consume_header)>));

    std::vector<wchar_t> buf(100);
    ifs.read(buf.data(), 100);
    std::basic_string<wchar_t> istr(buf.data());
}

UTF16の場合

#include <codecvt>
#include <iostream>
#include <locale>
#include <fstream>

int main()
{
    std::basic_ifstream<uint16_t> ifs("C:\\hoge1.txt", std::ios::binary);
    ifs.imbue(std::locale(
        ifs.getloc(), 
        new std::codecvt_utf16<uint16_t, 0x10ffff, std::codecvt_mode( std::little_endian |std::consume_header)>));

    std::vector<uint16_t> buf(100);
    ifs.read(buf.data(), 100);
    std::basic_string<uint16_t> istr(buf.data());
}

[C++] UTF32からUTF16への変換

#include <codedvt>
#include <locale>

const std::u16string u32ToU16(std::u32string u32Str) {
    // codecvt_mode で little endian を指定
    std::wstring_convert<std::codecvt_utf16<uint32_t, 0x10ffff, (std::codecvt_mode)1>, uint32_t> converter;
    return reinterpret_cast<const char16_t *>(converter.to_bytes(reinterpret_cast<const uint32_t*>(u32Str.c_str())).c_str());
}

VS2015の不具合(*)によりchar32_tが使えないためuint32_tを指定しているが、LinuxやMacであればchar32_tでよいはず。

(*リンクエラーになる)

[Swift/iOS] フリックで更新するTableView

SNSのアプリなどでおなじみのタイムラインを下にフリックしてテーブルを更新させるためのコードです。

例として1から6までの数字が並んだテーブルがフリックする度に数字が2倍されていくというものを作ります。
この2倍する処理がネットワーク経由でデータを更新する処理だと思ってください。


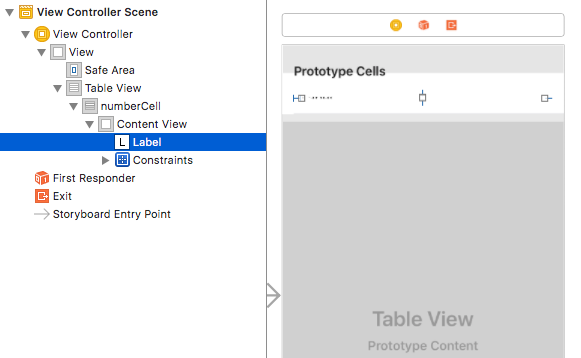
UI部品の配置

  • デフォルトのViewの中にTableViewを追加
  • TableViewの中にTableViewCellを追加
  • TableViewCellの中にLabelを追加

TableViewCellの設定

  • UITableViewCellを継承した新しいクラス(NumberCell)を追加
  • TableViewCellのIdentity Inspector→Custom Class→ClassにNumberCellを指定
  • Attribute Inspector→Table View Cell→Identifierに識別子(numberCell)を指定
  • Labelにカーソルを合わせてCtrlキーを押しながらNumberCellにドラッグしコネクションを設定

import Foundation
import UIKit

class NumberCell: UITableViewCell {
    
    @IBOutlet weak var label: UILabel!    
}

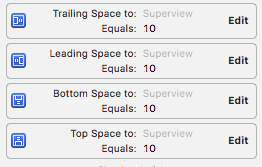
Labelの設定

  • Labelの上下左右にスペースのConstraintを設定

ViewControllerの設定

  • UITableViewDataSourceとUITableViewDelegateを継承
  • UITableViewDataSourceとUITableViewDelegateの必須メソッドを実装
  • UIRefreshControlオブジェクトを生成しUIRefreshControl.addTarget()でスワイプ時に呼ぶメソッド(refresh)を指定
  • refreshControlオブジェクトをaddSubview()でTableViewにサブビューとして追加
  • refreshを実装。必ずUIRefreshControl.endRefreshing()を呼ぶ
import UIKit

class ViewController: UIViewController, UITableViewDataSource, UITableViewDelegate {
    
    @IBOutlet weak var tableView: UITableView!
    
    var numberList:[Int] = [1, 2, 3, 4, 5, 6]
    var refreshControl:UIRefreshControl!
    let semaphore = DispatchSemaphore(value: 1)

    override func viewDidLoad() {
        super.viewDidLoad()
        
        tableView.delegate = self
        tableView.dataSource = self
        
        refreshControl = UIRefreshControl()
        refreshControl.attributedTitle = NSAttributedString(string: "再読み込み中")
        refreshControl.addTarget(self, action: #selector(ViewController.refresh), for: UIControlEvents.valueChanged)
        tableView.addSubview(refreshControl)
    }
    
    override func didReceiveMemoryWarning() {
        super.didReceiveMemoryWarning()
    }
    func updateTable () {
        //時間がかかる処理と想定してグローバルキューで実行
        DispatchQueue.global().async {
            
            for (i, num) in self.numberList.enumerated() {
                self.numberList[i] = num * 2
            }
            DispatchQueue.main.async {
                // UI更新はメインスレッドで実行
                self.tableView.reloadData()
                self.semaphore.signal()
            }
        }
    }
    
    //UIRefreshControl によって画面を縦にフリックしたあとに呼ばれる
    @objc func refresh() {
        updateTable()
        // 別スレッドでの処理が終了するのを待つ
        semaphore.wait()
        semaphore.signal()
        //この処理の前にbeginRefreshingが呼ばれているはずなので終了する
        refreshControl.endRefreshing()
    }
    
    //UITableViewDataSourceプロトコルの必須メソッド
    //テーブルの行数を返す
    func tableView(_ tableView: UITableView, numberOfRowsInSection section: Int) -> Int {
        return numberList.count
    }
    
    //UITableViewDataSourceプロトコルの必須メソッド
    //指定行のセルデータを返す
    internal func tableView(_ tableView: UITableView, cellForRowAt indexPath: IndexPath) -> UITableViewCell {
        guard let cell = tableView.dequeueReusableCell(withIdentifier: "numberCell", for: indexPath) as? NumberCell else {
            return UITableViewCell()
        }
        cell.label.text = String(numberList[indexPath.row])
        return cell
    }
    
    //UITableViewDelegateプロトコルの必須メソッド
    //行をタップされたときに呼ばれる
    func tableView(_ tableView: UITableView, didSelectRowAt indexPath:IndexPath) {
        print(numberList[indexPath.row])
    }
}

[Swift4/iOS] TableViewで高さの違うセルを表示する

Twitterの投稿をTableViewで表示する場合など、各セルの高さを投稿の長さに応じて変えたい場合があると思います。
例)

そんなときのコード例です。

UI部品の配置

  • デフォルトのViewの中にTableViewを追加
  • TableViewの中にTableViewCellを追加
  • TableViewCellの中にLabelを追加

TableViewCellの設定

  • UITableViewCellを継承した新しいクラス(TextCell)を追加しIdentity Inspector→Custom Classで指定する
  • カーソルをLabelにあてて、Ctrlキーを押しながらTableViewCellクラスにドロップ。コネクションを設定する
  • Attribute Inspector→Table View Cell→Identifierに識別子(textCell)を設定
import UIKit

class TextCell: UITableViewCell {

    @IBOutlet weak var label: UILabel!
}

Labelの設定

  • Attribute Inspector→Label→Linesをゼロに設定
  • Labelの上下左右にスペースのConstraintを設定

ViewControllerの設定

  • カーソルをTableViewに合わせてCtlキーを押しながらViewControllerにドラッグ。コネクションを設定する
  • viewDidLoad内でtableView.rowHeightにUITableViewAutomaticDimensionにセット。tableView.estimatedRowHeightも適当な値をセットしておく
  • UITableViewDataSourceとUITableViewDelegateを継承
  • UITableViewDataSourceプロトコルのメソッドを実装
  • UITableViewDelegateプロトコルのメソッドを実装
import UIKit

class TableViewController: UIViewController, UITableViewDataSource, UITableViewDelegate {

    @IBOutlet weak var tableView: UITableView!
    
    let textList:[String] = [
    "Hello World",
    "Hello World\nHello World\nHello World\nHello World\nHello World\n",
    "Hello World",
    "Hello World\nHello World\nHello World\n",
    "Hello World\nHello World\n"]
    
    override func viewDidLoad() {
        super.viewDidLoad()
        
        tableView.delegate = self
        tableView.dataSource = self
        
        tableView.estimatedRowHeight = 100.0
        tableView.rowHeight = UITableViewAutomaticDimension
    }
    
    override func didReceiveMemoryWarning() {
        super.didReceiveMemoryWarning()
    }
    
    //UITableViewDataSourceプロトコルの必須メソッド
    //テーブルの行数を返す
    func tableView(_ tableView: UITableView, numberOfRowsInSection section: Int) -> Int {
        return textList.count
    }

    //UITableViewDataSourceプロトコルの必須メソッド
    //指定行のセルデータを返す
    internal func tableView(_ tableView: UITableView, cellForRowAt indexPath: IndexPath) -> UITableViewCell {
      
        guard let cell = tableView.dequeueReusableCell(withIdentifier: "textCell", for: indexPath) as? TextCell else {
            return UITableViewCell()
        }
        
        cell.label.text = textList[indexPath.row]
        return cell
    }
    
    //UITableViewDelegateプロトコルの必須メソッド
    //行をタップされたときに呼ばれる
    func tableView(_ tableView: UITableView, didSelectRowAt indexPath:IndexPath)
    {
        print(textList[indexPath.row])
    }
}