SNSのアプリなどでおなじみのタイムラインを下にフリックしてテーブルを更新させるためのコードです。
例として1から6までの数字が並んだテーブルがフリックする度に数字が2倍されていくというものを作ります。
この2倍する処理がネットワーク経由でデータを更新する処理だと思ってください。
UI部品の配置
- デフォルトのViewの中にTableViewを追加
- TableViewの中にTableViewCellを追加
- TableViewCellの中にLabelを追加
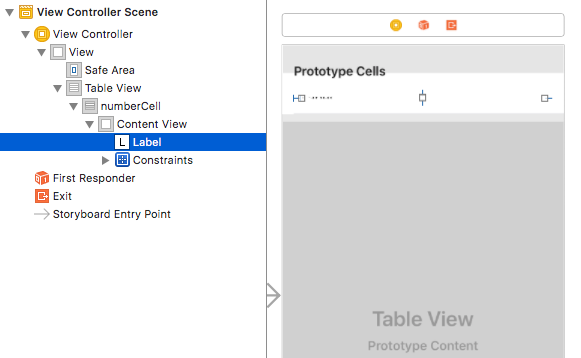
TableViewCellの設定
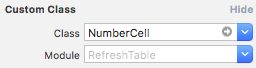
- UITableViewCellを継承した新しいクラス(NumberCell)を追加
- TableViewCellのIdentity Inspector→Custom Class→ClassにNumberCellを指定
- Attribute Inspector→Table View Cell→Identifierに識別子(numberCell)を指定
- Labelにカーソルを合わせてCtrlキーを押しながらNumberCellにドラッグしコネクションを設定

import Foundation
import UIKit

class NumberCell: UITableViewCell {

    @IBOutlet weak var label: UILabel!
}
Labelの設定
- Labelの上下左右にスペースのConstraintを設定

ViewControllerの設定
- UITableViewDataSourceとUITableViewDelegateを継承
- UITableViewDataSourceとUITableViewDelegateの必須メソッドを実装
- UIRefreshControlオブジェクトを生成しUIRefreshControl.addTarget()でスワイプ時に呼ぶメソッド(refresh)を指定
- refreshControlオブジェクトをaddSubview()でTableViewにサブビューとして追加
- refreshを実装。必ずUIRefreshControl.endRefreshing()を呼ぶ
import UIKit

class ViewController: UIViewController, UITableViewDataSource, UITableViewDelegate {

    @IBOutlet weak var tableView: UITableView!

    var numberList:[Int] = [1, 2, 3, 4, 5, 6]
    var refreshControl:UIRefreshControl!
    let semaphore = DispatchSemaphore(value: 1)

    override func viewDidLoad() {
        super.viewDidLoad()

        tableView.delegate = self
        tableView.dataSource = self

        refreshControl = UIRefreshControl()
        refreshControl.attributedTitle = NSAttributedString(string: "再読み込み中")
        refreshControl.addTarget(self, action: #selector(ViewController.refresh), for: UIControlEvents.valueChanged)
        tableView.addSubview(refreshControl)
    }

    override func didReceiveMemoryWarning() {
        super.didReceiveMemoryWarning()
    }
    func updateTable () {
        //時間がかかる処理と想定してグローバルキューで実行
        DispatchQueue.global().async {

            for (i, num) in self.numberList.enumerated() {
                self.numberList[i] = num * 2
            }
            DispatchQueue.main.async {
                // UI更新はメインスレッドで実行
                self.tableView.reloadData()
                self.semaphore.signal()
            }
        }
    }

    //UIRefreshControl によって画面を縦にフリックしたあとに呼ばれる
    @objc func refresh() {
        updateTable()
        // 別スレッドでの処理が終了するのを待つ
        semaphore.wait()
        semaphore.signal()
        //この処理の前にbeginRefreshingが呼ばれているはずなので終了する
        refreshControl.endRefreshing()
    }

    //UITableViewDataSourceプロトコルの必須メソッド
    //テーブルの行数を返す
    func tableView(_ tableView: UITableView, numberOfRowsInSection section: Int) -> Int {
        return numberList.count
    }

    //UITableViewDataSourceプロトコルの必須メソッド
    //指定行のセルデータを返す
    internal func tableView(_ tableView: UITableView, cellForRowAt indexPath: IndexPath) -> UITableViewCell {
        guard let cell = tableView.dequeueReusableCell(withIdentifier: "numberCell", for: indexPath) as? NumberCell else {
            return UITableViewCell()
        }
        cell.label.text = String(numberList[indexPath.row])
        return cell
    }

    //UITableViewDelegateプロトコルの必須メソッド
    //行をタップされたときに呼ばれる
    func tableView(_ tableView: UITableView, didSelectRowAt indexPath:IndexPath) {
        print(numberList[indexPath.row])
    }
}


